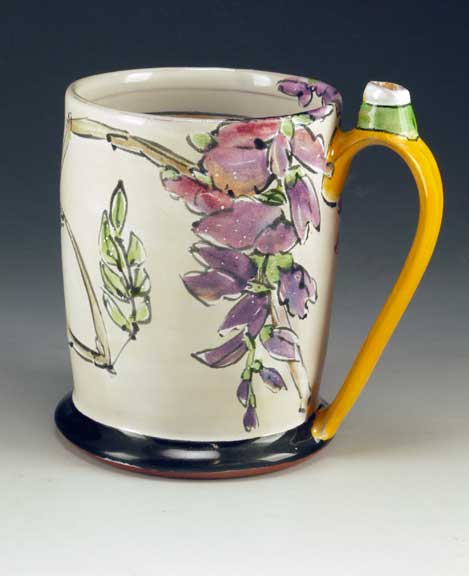
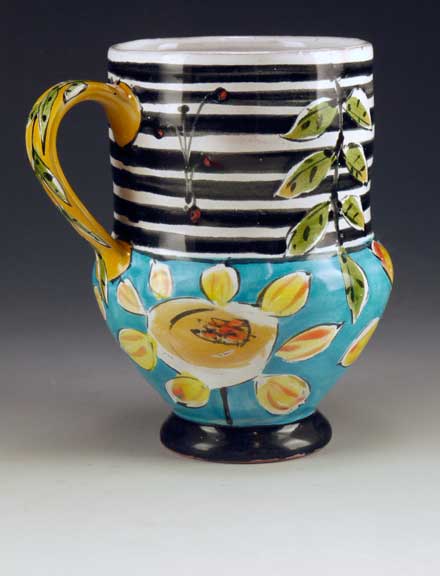
Busy morning getting some work shot, invoiced, packed up and off to The Art of the Cup: Functional Comfort. The show will run from Sept. 6th – Dec. 10th at the Ogden Museum at University of New Orleans. NOLA is always a good audience for beauty and comfort, and I’m pleased to be showing up there.
I knew I had to ship today, but discovered to my horror at 7 a.m. that they also wanted high-res images as well. Uh oh. Glad I could shoot at home and didn’t have to deal with getting a photographer. On my web site is a link to info about my photo setup. In undergrad school I minored in textiles loved to screen print fabrics until I had hand problems. As a practical fall-back, I decided photo would help me in any art career, and took less manual work than squeegie-ing ink on yardage. Those were the days of black-and-white film and silver prints in the darkroom, where a good day printing (like any deep studio experience) stopped all sense of time. Gainesville artist Jerry Uelsmann, international photo rock-star and UF Professor Emeritus, still prints his surreal images with silver process and multiple enlargers in a darkroom.Part of me misses the physicality of making b&w prints, but much of me is happy I can do quick digital documentation of my work at home. It’s within the grasp of most artists to learn to shoot serviceable images of their own work. Certainly, a professional photographer can really make glamor shots with great lighting happen, but many of us can’t afford the money or time to hire a professional. In the early days of digital photo, talk on the street was that it was a fun novelty, but would NEVER rival the quality of film. A lot of progress has been made. One of the advantages is that you can try any shot at no cost in materials, and take it to your computer right away to see how that lighting and those settings worked out for you. There are free photo programs available online. I can’t say I’ve used them (I use an older version of Adobe Creative Suite), but have read that the free Picasa and GIMP are popular. Adobe’s lower-end Photoshop Elements program is another budget solution to working with images. For very basic things, there are some tools in Microsoft Office’s Picture Manager. In Office 2007, it’s in the TOOLS folder of the program menu.
Basic image management probably includes adjusting any errors in color and contrast, cropping where needed, manipulating image size, and converting file format where needed. There’s a lot online to help people getting started with these mysteries. For the images below, the camera saw the fluorescent photo flood light as more yellow than my eyes, and I had to adjust the color a bit to look true. One of the images was a bit crooked and I had to rotate it a bit to look straight. The images were taken as RAW (uncompressed data) for any future high-end print use, and large jpg for current digital and casual print use.
For web use or e-mail, images need to be made small. Please don’t send people print-sized images by e-mail. If you live in a rural location, as I do, with s-l-o-w internet, it takes nearly forever to download a huge file. Anyone receiving mail via a paid data plan, like on a smartphone, will not want to pay to look at your huge images.
Printers would like 300+ pixels per inch and need a big file to make a lovely print. Many cameras are set by default to take images at print resolution, as you can downsize images for other uses, but not up-size a small image for bigger use (they get pixellated and fuzzy if you do that.) Digital screens only render 72 pixels per inch – ppi. All the rest of your 5 meg digital image is just wasted space and time if it’s just for digital only use. The original jpg images for those below are about 2.4 megs – that’s 2400 kb. The camera I use (Lumix G1) shoots at a high setting at 180 ppi, but a huge image: 21 x 15 inches. That means at 300 ppi, I can print a very nice image in the neighborhood of 10 x 8. The images below are re-sized in Photoshop for tidy digital use: 72 ppi, 10″ H x 7.5 or so W, and saved in Photoshop under the FILE menu, SAVE FORE WEB AND DEVICES, which compresses the file into a small size. Saved in that as a medium-quality jpg it’s about 30 kb of data (vs. 2400 kb+ in the original.) Still a large, crisp image on screen, but a polite, small file size.
Below, images of the cups I sent off to the upcoming Ogden show. I did send them the big files by e-mail, as they requested high-res images that they could use for print media, or make smaller for digital.

